Showing posts with label Vegetarian. Show all posts

Wednesday, August 5, 2020

Three Mushroom Tart

I made this a few times after meeting my husband but I believe the last time may have been a distance birthday.  It was the weekend my husband met my parents at their NC home.  A few of us drove/flew there in order to attend a local symphony concert where my Dad, dressed in his tux, was to direct the symphony in Radetzky's March.  At the time, we didn't know what song so it was all a surprise to us when he appeared on stage at the end.  Back story is that earlier that year he attended a silent auction and won the bid to  conduct during an evening performance.  It was hilarious because during the piece, he stopped conducting and turned to face the audience and the audience roared with laughter as the symphony played on, not missing a beat.  It was all good fun.  That weekend is still a very fond memory of mine.  But that Sunday was my birthday and we had these tarts for a mid-day meal.  I recall that day as if it were yesterday.

This hails from April 1996 Gourmet Magazine, a well used issue of mine.  When I recently set out to make this, I couldn't recall where the recipe came from and looked for hours this past weekend until I found it.  I forgot I have a directory of all the recipes that I make (or would like to make) from my magazine collection.   But I was literally thumbing through the index of dozens and dozens of magazines scanning for it until I found it.  The directory is handy in that it is in alphabetical order and lists exactly where to find a recipe in my hundreds of magazines.  

So here's how you make this.  

Thaw a 1 Package of Puff Pastry or if you are talented make your own.  I have to admit, I've been watching The British Baking Show Master Class and plan to make my own soon.  That'll be for another day.

Read the recipe through and do all your prep in advance.  

Make sure you have a variety of 3 mushrooms.  You need at least one to have an appearance similar to enoki, or in my case Wegmans opened up nearby and I spied Beech (my new favorite).  

For the mushrooms -  8-10 Button, 8-10 Baby Bella (or Shitake), 6 oz Beech.  Pick out 4 of the best of the Button and Baby Bella that will be sliced for the top.  Take the rest and clean, trim the stems, and dice.  You should have about 3 Cups of diced Mushrooms total.  

To a skillet, add 2 TBL Unsalted Butter.  Add 1/2 Cup Minced Shallots and cook over medium heat to sweat, about 3 minutes.  Add diced Mushrooms, 2 tsp Worcestershire Sauce, Salt and Pepper.  Cook over medium high heat until the liquid is evaporated.  Add 1/4 Cup Sherry with 1 TBL Balsamic Vinegar and cook until the liquid evaporates.  Place this mixture in a bowl to cool.  Can be made in advance up to this point.

Preheat oven to 425.  Roll Puff Pastry and place in a rectangular tart pan.  

In a measuring cup, combine 1/3 Cup Heavy Cream with 1 Egg.  Add this to the cooked mushroom mixture.  Pour this into the prepared tart pan.  Slice the Button and Bella mushrooms into 1/4" slices and arrange them in rows along the long sides of the tart pan.  Place the Beech mushrooms down the center.  Brush with the Juice of a Lemon.

Place in hot oven and cook for 20-25 minutes until deep golden brown.  Don't open the oven door for the first 20 minutes.  Rotate the tart pan once and cook for final 5 minutes.  The pastry and filling should puff to a height taller than the tart pan.  Remove tart from oven and let rest for a few minutes before removing the rim.  Let rest another 5 mintutes and slice into 3-4 pieces.  Each tart will feed 3-4 depending on what else you serve.  A salad of some sort is highly recmmended.  


Monday, February 4, 2019

Fresh Pineapple

Fresh Pineapple is in season!  I know you can get them all the time but they are particularly good beginning now and under $2 each if you shop around.  I bought this one at Walmart for $1.78.   Sometimes I spirialze them and occassionaly I like large chucks eaten by itself.  I could tell by looking at it that it would be good with a firm looking skin and dark, hydrated and healthy looking crown. This is the second one I bought in a week.  It was ready to eat immediately and seems to be at it's peek!  They are in season beginning now through July!  

Friday, January 11, 2019

Zucchini and Tomato Mini Skillet Side Dish!

For Christmas, I gave my son these awesome 3 1/2" mini Lodge Skillets along with a skillet meals magazine.  We had to adjust the recipe for 4 mini skillets rather than a 10" skillet but it worked out well.   We will have lots of fun using them!  

First up, he had his friend K for dinner and I prepped and they built these cool side dishes.  Once done, we each had our own side dish served  hot from the oven.  Put these ingredients into separate dishes.  Thinnly Slice 1 Medium Zucchini.  Add Salt and Pepper to Zucchini and sweat the water from the Zucchini which will take about 15 minutes.  Slice 1 Small Onion, Thinnly slice the bulb of 1 Leek.  Cut in Half about 10-12 Grape or Cherry Tomatoes.  I make my own Bread Crumbs from the heals of bread but you can toast bread and make your own or even substitute Panko Crumbs.  

Preheat Oven to 375.  Lightly coat each pan with Olive Oil.  Add a layer of Onion.  Layer the Zucchini.  Add Leeks.  Top with Parmesan Cheese and Tomatoes.  Drizzle with Olive Oil and add a sprinkle of Oregano, Salt, and Pepper.  As we learned, these shrink slightly so you can fill them to the very top.  Bake in a hot oven for 25-30 minutes.  Let rest and serve on a small plate straight from the oven to the table  Enjoy!

Thursday, October 18, 2018

Brie Bites in Phyllo Cups

This is one of those simple recipes.   I don't know what magazine this came from.  I cut it out and threw the magazine away when I was getting ready to move.  I made a couple of adjustments after making it a second time, so this is what I have.  


Preheat oven to 350.  

Buy 2 Packages of Phyllo Cups in the frozen secion.  They come pre-baked and 15 per box.  Place them on a cookie sheet.

Cut the rind off an 8oz Wheel of Brie.  Cut into strips about 1/4" thick.  Cut the strips into pieces about 1" long.  Add 1/2 tsp Red Pepper Jelly to the bottom of each cup.  Place Brie piece on top of the jelly and press down lightly.  Top with a Pecan half.  Brush the pecan with Melted Butter.  

Place in oven for 8-10 min until chesse is melted and bubbly.  Serve warm or at room temperature.

Friday, August 24, 2018

Avocado Caprese Salad

This was another video that was floating around.  You hardly need a recipe.

Heat 1/4 Cup Balsamic Vinegar with a Pinch of Sugar over medium heat.  As soon at it starts to simmer, remove from heat.  The water will evaporate to create a more concentrated thicker Balsamic Glaze. 

Cut Avocado in half and remove the pit.  Brush with Lemon Juice to keep from turning brown.  Cut Mozzarella Pearls  and Grape Tomaotes in half.  Add these to the avacado cavity.  Drizzle with Oil Olive and Balsamic Glaze.  Add S&P and Basil.  Serve at once. 

Friday, June 15, 2018

Jalapenos & Fresh Corn-off-the-Cob Corn Muffins

I have been wanting to make these for ages.  I had Fresh Corn-off-the-Cob and  home grown Jalapenos Peppers.  Though it's hot out today, I made them anyway. 

Feel free to mix up your own corn muffin mix from scratch, but I used Jiffy since I've been wanting to use it up.  Remember, muffins (no matter what kind) are wet into dry and are only mixed until just blended.  

This makes 10;  I like to leave the corners open for easy handling.  Preheat oven to 400.  Either grease a muffin pan or use paper muffin papers.  
Add 1 Box Jiffy Corn Muffin Mix to a bowl.  Add 1 Cup Fresh Corn and 1 Minced Jalapenos Pepper and stir.  In a measuring cup, measure 1/3 Cup Milk and add 1 Large Egg, stir to combine.  Add wet to dry and blend until just blended.  Using a scoop, fill each cup until 2/3 full.  Bake for 15-20 minutes.  

I plan to serve mine with honey flavored butter, but either ingredient on their own works well too!  Enjoy!!


Saturday, June 9, 2018

Potatoes Anna

This is a very old classic recipe.  It's simple to make and cooks in the oven.  

Peel 2-3 lbs Potatoes.  I used small Russets for this, because that's what I had on hand.  Cut a 1/2 Stick Butter into small cubes.  
Preheat oven to 425 and spray a 10" oven safe skillet with cooking spray.  I used my All-Clad stainless skillet.  

Using a mandolin, slice the potatoes to 1/16" and arrange them into the pan in a shingled, circular fashion.  After each layer, season lightly with Salt and Pepper and after every 2 layers, dot with butter cubes.  Make 6 layers in all and dot the top with butter.  

Cover the skillet and place in hot over for 40 minutes.  Remove lid and bake for an additional 15-20 minutes til a deep golden brown.  Remove from oven and let rest for 5 minutes.  The "pancake" should easily be removed from the pan and place on a plate with the bottom side upward.  Serve at once, sliced into wedges.

Tuesday, April 24, 2018

Lemon Chiffon and Raspberries

My son worked on a restaurant project for Health class.  He had to have at least 1 dessert that was GF which was one of many requirements he had to create to satisfy dietary needs.  He came up with Lemon Chiffon and Blueberries, so in otherwords, a crustless Lemon Chiffon dessert.  

For bookclub tonight I volunteered to make a dessert and decided I would steal his idea.  I found beautiful raspberries yesterday so I substituted them for blueberries though any combination of readily available berries will work.  I made the chiffon from the Blueberry Lemon Chiffon pie already posted on my site.  It's light, not overly lemony or sweet - it's just pleasant enough and I've made it many times to date.  I decided to make individual portions in ramekins mostly because they'll be easy to tranport and I have one for each person.  
This recipe made (10) 4oz portions.  


Place 4-5 Raspberries (I bought 2 pints) in the bottom of each Ramekin and place on a sheet pan.    

Zest and juice 2 Lemons so you have 1/2 Cup Lemon Juice.  

Heat a pot of water that can be used as a double boiler so that when you place the bowl in the pot, it's a tight seal and the water reaches the bottom of the bowl.  

I have a hand mixer as well as a stand Kitchen-Aide mixer, so I use my hand mixer for the yolks and the Kitchen-Aide for the Whites.  

Separate 4 Eggs into 2 bowls, the yolks go into your double boiler bowl.  

While beating the yolks, slowly add 4 TBL of Super-fine Sugar.  The yolks will become pale and thicker and will create a ribbon when you raise the beaters.  While beating, slowly add the lemon juice and stir in the zest.  The mixture will thin out at this point.  Place the bowl on your pot of water and continue beating until the mixture becomes thick and is very warm to the touch.  Remove from heat without over cooking it.  

Beat egg whites until foamy and add a few pitches of salt then beat until the volume more than doubles and has medium peaks (ones that fold over but hold that shape) when you remove the beater.  Slowly add 3 TBL Super-fine Sugar and continue beating until stiff and glossy but not dry.  Fold whites into the yolks, adding small amounts at a time.  This should take 4-5 additions and you should be left with no whites showing and a consistent pale yellow color throughout.

Spoon or pipe chiffon onto the raspberries.  

When ready to serve, preheat oven to 400.  Bake for 10-12 minutes until golden brown.  Serve at once or at room temperature. 

Friday, February 16, 2018

Baked Broccoli Rice

I was walking through a big boxed store earlier this year and they were sampling Broccoli Rice.  I never buy stuff I can make at home but I knew it was something my growing teen would love.  So I sampled it in order to make up my own recipe.  It's really a simple dish to assemble and bakes for about 25 minutes plus it can be made ahead.  It lends itself well if you need to bring a dish with you.  Will pair nicely with any meat, for example, Grilled Steak, Roasted or Grilled Chicken, Baked Ham, Panko Crusted Pork Chops, really you name it.  It also holds the heat well if you are transporting it to someone's house.    

Preheat oven to 375.

First, cook the rice so it's slightly under done.  You should do this whenever baking any pasta or rice so you don't end up with mush.  

I like to use Bismatti Rice because the grains are long and the rice has a pleasant nutty flavor.  Add 1 Cup of Rice and 1 1/2 Cups of Water to a pot fitted with a lid.  Add Salt to taste and 1 TBL Butter.  Stir with a fork.  Cover and place over medium heat and cook until it's about to boil.  Reduce heat to low and simmer for about 6-7 minutes.  Turn off heat and give it another quick stir, replace lid and let the water absorb.  Remove from heat, rinse in cold water, and strain, to stop the cooking process.  You can leave it in the strainer.

Add 2" of water to a pot that will fit a steamer basket and heat water (without the basket) over medium heat.  Rinse and cut Broccoli so you have tops with a small amount of stem.  You want 2 Cups of Cooked Broccoli in total.  Place the Broccoli in the steamer basket and place it in the preheated pot with water.  Return lid and let steam for about 2 minutes.  The Broccoli should be bright green.  Remove from heat and rinse in cold water to stop the cooking process.  

Make a quick béchamel.  In a thick bottomed pot, over medium heat, melt 2 TBL Butter.  Once melted, add 2 TBL Flour and stir with a wire whip and cook until it bubbles gently for 3 minutes.  Do not let it brown.  Add 1 1/4 Cups Milk.  Let it cook for another 6-8 minutes, until it thickens.  Add 2 Cups of Grated 4-Cheese Mexican Blend and stir until the cheese is melted.  Season with Salt and Pepper to taste.  Add broccoli and rice to the sauce and gently stir with a spoon.  

Butter a caserole dish large enough to hold the rice mixture.  Add the mixture to the dish and top with bread crumbs.  Dot with 6-8 1 tsp bits of Butter and season lightly with Paprika.   

I grind my own bread crumbs, but Panko works well.  

Bake in hot over uncovered for 25-30 minutes until bubbly and warmed through.  Let rest for 5 minutes before serving.  


Friday, June 9, 2017

Pasta Night - for Everyone!

Our club offers a pasta night once a week.  It's a really cool concept.  Two times now I have done my own Pasta Night at home ~ once on account of having leftover Rigatoni and last night intentionally using a really good Italian Gluten Free Penne.  

In the even years, my family holds a week long family get-together at Thanksgiving with about 28-30 of us all eating meals together.  We change up some of the dinners from year to year.  Based on the the head count as it builds each day prior to Thanksgiving Day, we decide which dinners are for a smaller group vs the full group. 

This meal is cool because it's cooked to order and the selections are chosen by the diner which works well when trying to accommodate various dietary restrictions.  I have been trying to work this out to serve it for a large group.  Having a few cooks and multiple pans will make it possible for a large group.  I'm also thinking the kids eat first, then adults afterward.

It's all in the prep, then it goes together quickly and with a big group working together, that part is fun.  The more ingredients you have, the more combinations you can offer. 

For last night, for three of us, this is what I served.  I already had the Marinara made, so that saved a step.  I have a vegetable plot in our community garden and had some Broccoli and a small Red Cabbage that I picked about an hour before prepping.  I also picked some Thia Basil from the community garden and I had some Fresh Parsley in my herb pots.  I just bought Sugar Snap Peas and a Yellow Squash.  I also had 2 links of cooked Italian Sausage from the night before that I cut into 1/2" slices.  I also had a locally grown Onion that I bought last Sat at our local farmers market.  So you can see where this is going with all of these fresh ingredients.  

We are trying out a gluten free diet so I precooked and cooled a very good Italian Gluten Free Penne made by a company called Schar.  I made Afredo Sauce and had that near by.  I quickly steamed the sugar snap peas and the broccoli each for about two minutes and placed them in separate bowls.  I thinly sliced the onion and the cabbage and placed them in separate bowls.  I recently bought a new Mandoline and made waffle shaped slices with the Summer Squash.  You can add whatever you want though, sauteed peppers, roasted eggplant, sliced zuchinni, sliced (or quartered) mushrooms, cooked bonelss chicken breast, raw shrimp, capers, pressed garlic, etc.  The larger the group, the larger the offering.

I have a 12" All-Clad skillet that is perfect for this meal.  Heat the pan over medium heat and add a TBL of Olive Oil.  Add the ingredients that the diner requests.  Sauté these together for a few minutes adding Salt and Pepper to taste.  Add the pasta and toss for about 1 minute.  Add Alfredo and toss for about 30 seconds til combined and hot.  If the sauce thickens too quickly, have water ready and add a splash or two as needed.  

For plating, in a pasta plate, add marinara to the bottom and swirl.  Add the freshly cooked pasta to the plate and top with freshly grated Parmesan Cheese and garnish with Italian Herbs and S&P if needed.  Eat at once with a salad and hot crusty bread.  

Wash the pan and utensils and begin again.  

Other sauces that can be added instead of just Alfredo and Marinara are Pesto, Tepenade, a Roasted Red Pepper topping, and even a Marsala or Picatta.  So with the combinations, the dishes are endless.  

For a big group, set out the pasta plates and the ingredients buffet style.  Allow each diner the chance to add to the bowl what they would like.  Then they can bring it to the cook who can make the dish to order.  NOTE: If using raw Shrimp or any raw meat, the plate has to be washed before serving.  I would have raw shrimp near the cook who can add it directly to the pan and all other meats I would precook.

Another option is have everyone gather in the kitchen, allow the cooks choice on the combinations, enjoy them one by one as they are done by sharing straight out of the pan onto small plates.  

Have fun and photograph all the selections as the dishes are finished.  

Sunday, February 19, 2017

Gougeres

I moved to a new state about a month ago and am in a new Reading Club.  We read the book, The Nightingale by Kristin Hannah.  The story is set in France when the Germans occupied the country during WWII.  Though they probably didn't enjoy a food like this during that time on account of food shortages, this is said to have originated in the Burgundy Region of France.  

I have on my blog a Dauphine Potato recipe as well as Profiteroles, both based on simple Choux Dough recipes.  This dough is similar and is made savory with the addition of cheese, in particular Gruyere.  

In looking for a recipe to give a nod to the French, I found this recipe in my book where I have indexed recipes from late food magazines.  I've never made them so this is my first go at it.  Based on the font of nearby recipes on other pages, I am fairly certain it came from Food and Wine, December 1988, wow, so practically 30 years old!

Remove 6 Large Eggs  from the refrigerator and let them come to room temperature.  5 are for the recipe itself and 1 to brush on the Gougeres before baking.
NOTE: This recipe calles for a total of 5 EXTRA Large Eggs ~ so I made an adjustment on account of using Large Eggs
Preheat oven to 425.   
Grate 6 oz Parmesan Cheese and 1/2 Cup Gruyere Cheese into a bowl.  Set asside.  
In a medium bowl, combine 1 Cup Flour, 3/4 tsp Salt and 1/2 tsp Freshly Ground Pepper.  Set aside.

In a large heavy saucepan, combine 1 Cup Whole Milk and 1 Stick Unsalted Butter.  Bring to a boil over high heat, stirring as the butter melts.  Remove from heat immediately and add the flour mixture all at once.  Stir vigorously with a wooden spoon just until the dough masses into a ball and doesn't cling to the sides.  
Transfer dough to a mixing bowl and using the paddle beater, on medium, add a total of  5 Large Eggs, one at a time, mixing after until each egg is completely absorbed.  The dough should appear smooth and satiny and hold it's shape when a small amount is scooped with a spoon.  Add the Cheese Mixture and mix until throughly.  


I am going to use parchment paper on my sheet pans so they lift easily.  You can either pipe, scoop or spoon 2 tsp of batter into mounds leaving 1 1/2" of space between each.  

Beat remaining egg, and brush each gougeres with the egg glaze before baking.  Bake for 15-18 minutes until rich golden brown.  The recipe called for 10 minutes of baking time but I clearly needed more time.  

Serve warm or at room temperature.  
Can be made ahead and reheated before serving.  Bon appetit!!


Saturday, December 31, 2016

Martha Stewart's Oven-Dried Tomatoes

I am in the process of relocating to a new state.  The sad thing is, my new kitchen is nothing like the one I have.   So with this move comes cleaning stuff out and just reducing "my stuff" whether kitchen equipment, bowls I love that have a chip, or things I haven't used in years, it's all going to a new home before I depart.

I have years of Martha Stewart Living magazines, fully in tact.  I am going through them one by one and ripping out anything that is still of interest and pitching the magazine.

The other day I came across this oven roasted tomato recipe that I recall  wanting to make when I first read this issue years ago but somehow never found the time to do so.  We are having company for New Year's Eve and it will go nicely with the Asparagus with Brie Sauce (from Savoir Faire) my son plans to make as an hors d'oeurve.

This is really very simple and I could kick myself for not making it sooner.  You just have to plan ahead because it roasts for hours.  I decided since tomatoes aren't exactly in season, that I would buy four varieties of cherry tomatoes.  The recipe calls for "paste" tomatoes which appear like romas in her picture but they were sort of pale and these cherries will roast a little faster, say four hours rather than five hours.  Mine are roasting now and smell delicious!

So preheat the oven to 200.  Line a sheet pan with Parchment Paper.  Cut 16-20 Cherry Tomatoes in half.  Place them on the sheet pan cut side up.  Cut thin Slices of Garlic and place on each tomato.  Drizzle with good Olive Oil.  Add Fresh Thyme and season with Salt and Pepper.  Place in oven, in my case for four hours.  Check every 30 minutes after the first few hours.  Serve at Room temperature with a crostini, a peice of fresh spinach, a slice of Mozzarella Cheese, really what ever you have on hand.

They can be placed in a jar with additional Olive Oil and stored in the refrigerator for up to 3 days.

It's January 1, 2017.  Happy New Year!  I can tell you these were delicious.  5 of us ate them all along with the appetizer my son made.  Wow, I can tell you I will be making these often.  Thank you Martha Stewart!

Thursday, September 1, 2016

Couscous

I made a wonderful Couscous yesterday to bring to my book club meeting.  We read a book called The Diver's Clothes Lie Empty.   The book is set in Casablanca, Morocco.  Our club has evolved to  trying to prepare foods that are either mentioned in the books we read or served in the location of the setting.  I regret that I didn't photograph this dish, but will next time when I make it again.

The recipe in general came from The Gourmet Cookbook.  The recipe called for Moroccan Style Preserved Lemon Wedges which should have been made 5 days ahead and since I didn't have time I substituted Lemon Zest and Lemon Juice.

Here is how to make the dish.

Preheat Oven to 425.

Cut 1 1/2 Lbs Butternut Squash to a 1/4" dice.  Toss with Olive Oil and roast for 15 minutes, turning every 5 minutes.

While roasting is happening, cook 1 1/2 Cups Plain Couscous. (I used a 5oz box of Whole Foods 365 Couscous).  Boil together  1 1/2 Cups Water and 1/2 C Chicken Broth (use Vegetable Broth if making this for vegetarians) with 1/4 tsp Salt, 1/4 tsp Cinnamon and 1 Tbl Olive Oil.  Once boiling, slowly stir in couscous and remove from heat, keep covered and set aside for 5 minutes to cook.  Remove lid and stir with a fork to keep from clumping.

Meanwhile, toast 1/2 Cup Pinenuts in Olive Oil in a small skillet.  Chopped 1/4 Cup Parsley and set asside and measure out 1/2 Cup White Raisins.

To finish the dish, Dice 3/4 Cup Onion.  Preheat a large skillet over medium heat.  Add 1-2 Tbl Olive Oil.  Add Onion and cook until light brown.  Add Roasted Squash and stir.  Add Couscous and stir to combine.  Add Toasted Pine Nuts, Raisins and Parsley.  Add S&P to taste.  Remove to a large flat rimmed platter to keep from continuing to cook.  Serve immediately or at room temperature.  Enjoy!!

Wednesday, June 29, 2016

Spiralizer Vegetable Pancakes

I have been intrigued by the Spiralizer for sometime and being drawn to kitchen gadgets, I bought one.  Bed, Bath & Beyond sells the OXO for $40, $32 after the discount.   I chose that one because of the way the suction mechanism works.  It will get lots of use, though I am not so sure about zucchini cut into spaghetti and then cooked like spaghetti because I like my zuchinni carmelized. Because it's so watery, cooking in water seems like the workings for a watery mess to me.  We'll see, maybe it's pictured raw with olive oil and herbs but we are led to believe it's cooked.  

So first up for me was vegetable pancakes.  I make potato pancakes often enough but wanted to try vegetables along with a small Sweet Potato for a change.  They were fun to make and very tasty.  You can combine many vegetables, including things I chose but also, turnips, rutabagas, scallions, shallots, onions, bean sprouts, black olives, zuchinni, summer squash, jicama, etc.  Really anything you are in the mood for.


We just got a local Whole Food a few weeks ago.  They have tri-colored carrots on their immense salad bar so that became my inspiration.  I figured they must sell them as well and I was right.


It takes a little practice to use the spiralizer and the short ends of the carrots didn't work as well because there isn't anything to grip.  The fatter halves worked better, so I cut them in half.


What I spun created 12 nicely sized vegetable pancakes.  Spiralize onto a sheet pan, 1 Small Peeled Sweet Potato, 1 Peeled Orange Carrot, 1 Peeled Red Carrot, 1 Peeled Yellow Carrot, 1 Medium Zuchinni. To this I added 1/2 Red Onion cut along the radius to make long strips.  Place all of the vegetables in a bowl.  Beat 2 Eggs with a few TBL of Milk.  Add to vegetables.  Generously add S&P to taste.  Add enough Flour to coat the vegetables so the excess moisture is absorbed.  Right before cooking, I dusted with a bit more flour so the vegetable mixture isn't soupy.  


Preheat the oven to 250 and have ready a sheet pan with a cooling rack inserted.  Preheat a skillet over medium heat and add 1/2" Canola Oil.  Make small pancakes and place in hot oil.  Flip over one time once golden brown.  You can add additional S&P if needed to the cooked side.  What's neat is because the spirals come out as very long strands, you have to break them apart and the result is that no 2 are alike.  


Place the cooked pancakes on the cooling rack and place them in the oven once they are all cooked.  Serve warm!

Sunday, June 15, 2014

Lemon Blueberry Pancakes


If you like light lemony things, you will love this recipe!!  We have 6 Blueberry Bushes in our yard that must be about 18-20 years old.  They produce an abundance of blueberries in spring when we have winters of heavy rain and this year was a doozy.  They were 3 weeks late this year, on account of a cold winter, but they were abundant!!

On Father's Day, we were getting the first of our blueberries and I usually have a bag on lemons on hand at any given moment, so that's was on the breakfast menu.

I took my Mom's Buttermilk Pancake recipe and amended it by substituting some of the Buttermilk for lemon juice.  The results were tasty.  The surprising part was the fact that instead of 12 pancakes it made 18.  The difference was air.  When the lemon hit the baking powder it expanded in such a awesome way, that the pancakes were light and fluffy.  The typical golden brown outside became sightly caramelized because of the lemon and had a really good flavor. 

The first round was served with Vermont Fancy Grade Syrup but it conflicted somewhat with the lemon.  In the end all they needed were a smear of butter and a dusting of powder sugar.  Wow delicious!!

Preheat your griddle to 375.  In the meantime, place the dry ingredients into a bowl.  1 Cup Flour (or mixture of flours ~ I used all-purpose and whole wheat totaling 1 cup), 1 TBL Sugar, 1 tsp Baking Powder, 1 tsp Baking Soda, 1/2 tsp Kosher Salt, the Zest of 1 Lemon.

I was given a neat juicer for squeezing lemons and limes.  Cut the zested lemon in half and have handy the juicer.  

To a measuring cup add, 3/4 Buttermilk, 2 TBL Canola Oil, and 1 Egg.  Give it a stir.  Juice both halves of the lemon into the mixture.  Add the wet ingredients to the bowl.  Stir with a wire whip until smooth.  Fold in as many Blueberries as you want up to 3/4 Cup.  You will see the batter expand right away.

Spread Crisco on the griddle where you intend to place the pancakes.  I use Crisco because butter has a very low smoke point and will burn and oil doesn't stay put.  Pancakes need to set up and brown quickly and the higher heat helps them rise.  I have found that Crisco offers better results. 

Ladle the desired size, cooking 6 at a time.  I like a short stack of 4 pancakes so I use about 1/4 cup of batter per pancake.  Because of the light nature of this batter, the berries will settle on the bottom.  When ladling, you have to go to the bottom for the fruit.

You are going to turn the pancakes only once.  Once they look done around the edges and the top batter is still wet, flip quickly.  I find I use less butter if I lightly, without deflating the pancakes, add butter to the cooked side at this time.  Once the second side is cooked to your liking, place a stack on a plate and dust with Powdered Sugar.  Serve immediately as they come off the griddle.

NOTE: for a few variations, you can add toasted Nuts or Oatmeal to the pancakes at this time or for a decadent breakfast, Whipped Cream.  In the winter when Raspberries are in season, substitute them! 


Sunday, March 30, 2014

Broiled Artichokes

I love artichokes!!  Right now, I believe Artichokes are coming into season because they look awesome and the price is low, $.99 each for large.

I don't cook them often enough.  In the past, I have made this really neat recipe for oven baked stuffed artichokes from a Tuscany The Beautiful Cookbook that I own.  The leaves are pulled apart and stuffed with milk soaked bread.  They are sealed tightly and baked.  I will have make them soon and share that recipe with you.

A few months ago while in Baton Rouge, I ate at J. Alexanders for lunch.  The food was delicious, btw!!  The Fired-Grilled Artichoke appetizer was outstanding!  Additionally, about 10 years ago, I ate at The Cheesecake Factory in Maryland.  There, I had also ordered an artichoke appetizer that was wonderful, similar to the fire-grilled variety, but served with reduced balsamic glaze.

As a kid, when my mother brought home artichokes, we cooked them in seasoned water with Lemon, Olive oil, salt and whole peppercorns.  Once done, we ate them while standing around the kitchen counter.  We simply pulled the leaves off, one at a time, and dipped the leaves in melted butter.

The inspiration for today's recipe comes from all of those experiences and spans the many years. So today, I am going to make up a recipe that combines the two preparations.  Artichokes take time to cook and are inedible if undercooked.  I feel that broiling alone will leave them undercooked, so I am cooking them first and broiling them later.

I am working with 2 large Artichokes. First, using a very sharp knife (I just sharpened mine 2 days ago) remove them bottom outside set of leaves since they can be tough.  Next, trim the stem so the artichoke is flat on the bottom.  Trim 1/2" off the tops of the leaves and using a spoon, clean cut the very center of the fine purple leaves and try to remove the parts that resemble "hair".  They are very fine fibers.  Soak them in water to rinse while you are working.

To a pot, add enough water that the chokes will be covered.  Add the squeeze of 4 lemon wedges then drop the wedges in the pot.  Add 1/4 Olive Oil, 1 tsp Salt, and 20-30 peppercorns.  The peppercorns can be any color you choose.  Add the artichokes and heat over medium until simmering.  Cook for about 35-45 minutes, depending on the size.  Remove from water, let cool for 5 minutes (up until now can be made ahead).  Once cool enough to handle, cut the artichokes in quarters.  Place on a sheet pan, cut side up. 

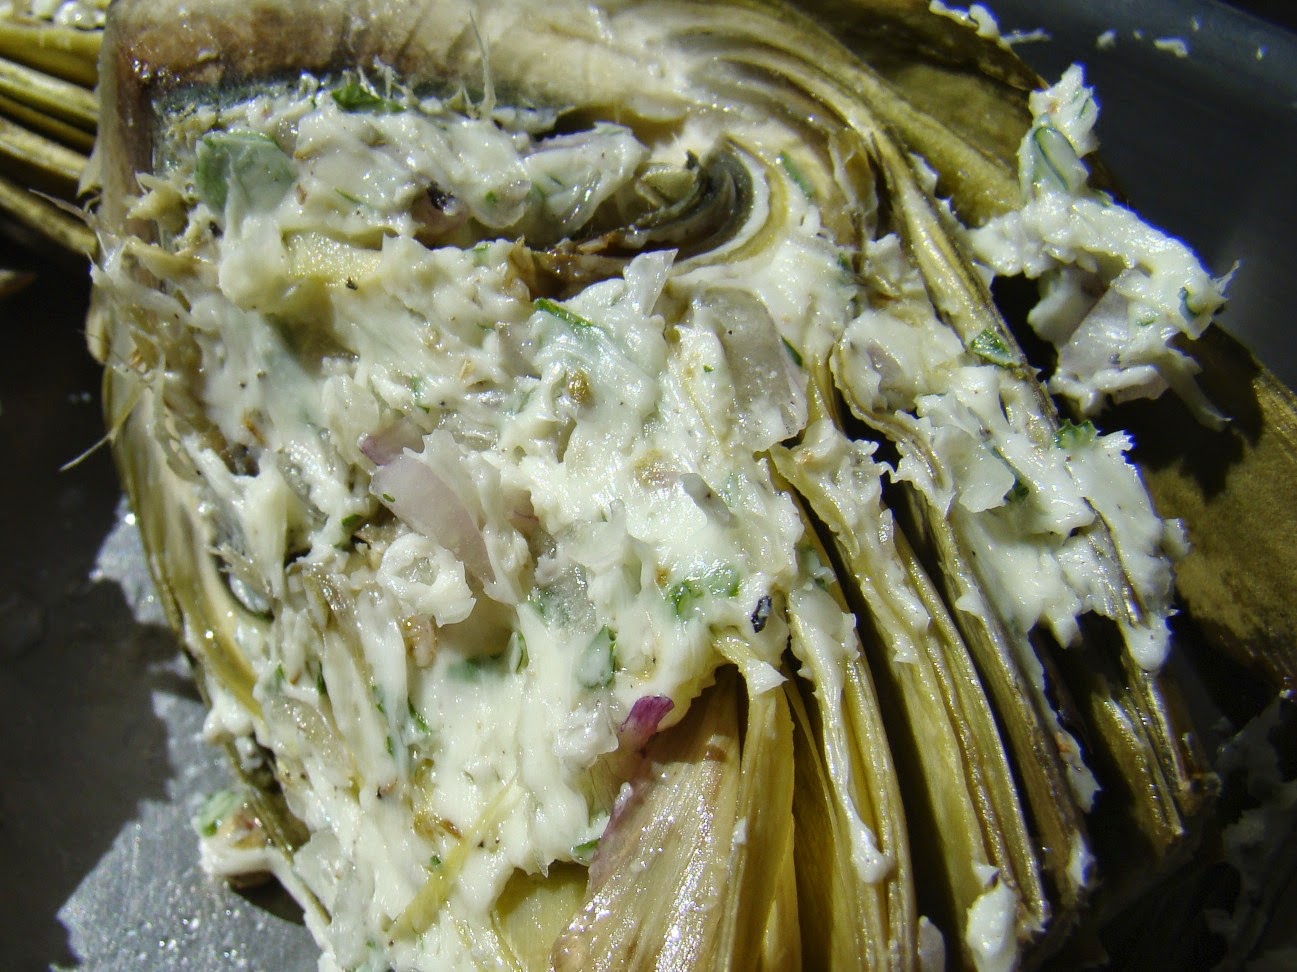
Make an herbed compound butter by combining 3 Tbl Softened Butter, 1 Minced Shallot, Salt and Pepper, Fresh Parsley.   Add the butter to the cut side of the artichoke and try to get some in between the layers.

Preheat the broiler and when hot add the artichokes and cook for 5-7 minutes until browned.  While broiling, add 1/4 Cup Balsamic Vinegar and 1/4 tsp Sugar to a saucepan.  Reduce over medium heat for a few minutes until thickened.  Place the artichokes on a platter and drizzle with Olive Oil and Vinegar.  Eat right away with warm crusty bread.


Friday, December 20, 2013

The story of Christmas...Fresh Cabbage turned into Cole Slaw

My tennis team adopts a family each year during the holidays.  This year I got to work directly with the mom/wife.  Her husband grows an incredible garden each season and he gave me a few HUGE cabbages from their winter garden as a token of their thanks!  Isn't that cool?  And aren't these beautiful?

The night I received them, I was roasting a Pork Loin in the oven and decided to make Cole Slaw to go along with it.  Not having a recipe, I made up a cole slaw dressing. 

First, I removed the outer leaves working with the tender lighter green leaves since it was going to be eaten raw.  Next, I removed the stem so I could fill it with water to rinse the leaves.  I turned it back stem side down to let it drain. 

Using a Bread Knife, I cut it in half which further allowed the water to run out.  So beware you have to clean it up because it holds a lot.  I used one full 1/2 Cabbage to make 6-8 side portions of cole slaw.  Using the bread knife, I cut thin slices, creating shreds.  I grated 1 Large Carrot and thinly sliced 1/2 Cup Red Cabbage that we happened to have on hand.  All of this was placed in a wooden bowl. 

Next, the cole slaw dressing.  Using a 2 Cup measuring cup, Add 1/2 Cup Olive Oil.  Add 2 TBL Rice Vinegar and 1/4 Cup Apple Cider Vinegar.  Stir in 1 tsp Kosher Salt and 2 tsp Sugar.  Using a wire whip, add 1/4 Cup Mayonnaise and 1/4 Cup Sour Cream.  Stir to combine and season with  Pepper and Celery Seed to taste.  Add more Salt, Mayonnaise or Sour Cream if needed.

Once you have the flavor the way you want it, pour 1/4 Cup of dressing onto the cabbage mixture and toss well before adding more.  The cabbage should be coated well but not swimming in dressing.  Serve at once for a delicious cold side dish/salad.  The cole slaw may be kept in the refrigerator for a few day already dressed.  I would tend to make what is going to be eaten and make it again.  The dressing can be kept for weeks in the refrigerator.

When I saw the Mom the next day, I gave her a jar of the dressing so she could make cole slaw for her family.  Enjoy and consider adopting a family one year, too!


Saturday, December 14, 2013

Salmon, Scales on, Cooked in the House

Every time I hear the word "salmon", it reminds me of an early episode of American Idol where Kellie Pickler was describing to Simon a dinner she had the night before.  She told him she a eaten saLmon for the first time, pronouncing the L.  He didn't quite know at first what she was talking about and finally he said something like, oh, salmon, saying it properly.  She looked at him dead serious and said you know there is an L in there.  It was too cute.

As my son says, moving on...
We have been cooking salmon more often than in the past and the main reason is that I have found a suitable way to cook it.  I have a previous post where I grill it and that is divine, but at times I don't want to mess with the grill.  I like my salmon just under done, firm but tender and ever so slightly, soft.  My husband wants his rare.

The first line of success is that we shop for 2 pieces of Salmon that are different thickness.  We always buy the salmon the day we are cooking it and I don't want any leftover.  The fillets should be firm to the touch, have relatively little to no smell, and be very bright in color.  The fish for dinner last night came from the Mandeville Seafood Market on Highway 59 and it was super fresh.  I think it was around $9.99 a pound.

For this preparation, I preheat the oven thoroughly to 350 and I preheat an empty pan over medium heat.  I rinse the fish and pat it dry.  I add a drizzle of olive oil to the flesh side of the fish and add S&P.
I begin with my piece of salmon.  I add it to the skillet, FLESH side down.  After about 4 minutes or so, and once browns, it will easily lift from the pan in 1 piece.  I turn it over now scale side down. 

At this time, I add the thicker piece of salmon to the skillet, SCALES side down.  I sprinkled dill on the the flesh side of both pieces.  I place the pan in the oven for 8-10 minutes depending on how thick it is.  While it is finishing in the oven, I thinly slice a lemon.  When I remove it from the oven, I place each piece of salmon on our respective plates.  I add 1/2 TBL butter to the fish and let it melt over the flesh.  Next, I layer the thin sliced lemon and sprinkle a bit more dill.  My husband likes capers so I add them at this time. I tent the plates with a piece of foil and let it rest for 5 minutes.

For this meal, I happened to have risotto that I made the day before and had that warming on the stove.  When we were ready to eat, I sprinkle my fish with a pinch of Hawaiian Black Salt that I bought this summer.  It was crunchy and really tasty.  I felt it complimented the fish well, you know, Hawaii & Salmon, a good combination.

NOTE:  If you both like the same doneness, just stick to one or the other preparation.  I hope you give this a try.  Salmon is a really great fish for a lot of reasons.  The nutritional value is superb. 

Tuesday, July 30, 2013

Mushrooms Marsala with Fresh Pasta

This idea goes back a few years ago when I entered some sort of dish into a cooking competition.  That dish inspired me to make this dish.  The thought has been swimming around in my head and I am just getting around to making it for today's lunch.
Last week, I made pasta sheets for my Roasted Eggplant Lasagne and when I was done, I rolled the extra dough into sheets.  I have mushrooms in the refrigerator and thought it would be tasty to make Mushrooms Marsala and arrange the mushrooms on cooked squares of pasta to create a loose stack.  To top it off, I'll add a light dusting of Fresh Parsley and Parmesan Cheese.
This is my recipe for Mushrooms Marsala.  Get a large pot of water on high for cooking the pasta.  If you are using dried lasagne sheets, cook them before cutting them into squares.  Of course, you can always serve this over a dried pasta shape of your choice.  And better yet, if you make pasta, then my all means make some.
First, wipe clean and slice thinly, 1 Pint of Bella Mushrooms.  In a small bowl, stir 2 Tbl Corn Starch with 1/4 Cup Beef Broth.  NOTE: For vegetarian, use Vegetable Broth.  Measure out 1/2 Cup Marsala Wine.
Heat a large skillet over medium high heat.  Add 1 Tbl Olive Oil and 1 Tbl Butter.  Add mushrooms and saute them quickly.  Deglaze the pan by stirring in the 1/2 Cup Marsala Wine and continue cooking for about 2 minutes.  It should bubble and appear to make a glaze.  Add the corn starch mixture.  Add beef broth until you have used a total of 1/2 of the can, you can add more if needed but do so slowly.  Season with S&P.  Continue to let the sauce cook, allowing it to bubble gently for another 4-5 minutes.  Turn off heat and add 1 Tbl Butter and swirl the pan after it has melted.  Cook the pasta either now, if fresh, or while you are making the sauce.
Layer the pasta and Mushroom Marsala Sauce on a warm plate and top with Parmesan Cheese and Finely minced Fresh Parsley.
I edited the sauce to result in a thicker sauce than what is pictured.  I liked the flavor but the sauce was slightly thinner than what I was going for. 

Thursday, July 25, 2013

Roasted Eggplant Lasagne

I created this recipe in my head at least a few weeks ago and finally made it for dinner last night.  We all thought it was delicious!!  I used the Feta Cheese Filling I had in my freezer (recipe on this site).  But you can season a mixture of ricotta and mozzarella cheese for a short cut.  I already had some Marinara made as well, so that made life easier for me. I made my own pasta sheets while the Eggplant was roasting but you can use the no-bake sheets available at the grocery. NOTE:  I made and photographed a triple layer lasagne and I could've made it 4 layers.   Next time I will.  This recipe is for 4 layers.

If you are making your own marinara, make that first.  You will need about 3-4 cups total when using fresh pasta.  For dried pasta, you will need to add a bit of water to the lasagne so the pasta doesn't dry out the lasagne. 

Preheat oven to 300 for convection, otherwise 325.  Line 2 sheet pans with parchment paper for simple cleanup.  Next, Peel and Cut to 1/4" slices, 3 Medium Eggplants.  Brush each side generously with Olive Oil.  Season with S&P and place in oven.  After 20 minutes, flip the eggplant over and if it looks dry, brush with additional olive oil.  Rotate the pans and cook for the remaining 20 minutes, 40 minutes in all.  Remove from the oven when golden brown. 

While eggplant is roasting, get everything set up.  If you are making pasta sheets, get them done and cut.  Mix 8 oz Ricotta Cheese with 2 Cups Mozzarella Cheese.  Add 1 Egg Yolk, 2 tsp Dried Oregano (for Fresh 1 Tbl), 2 Tbls Fresh Parsley, 1 tsp Basil (for Fresh 2 Tbl), 1 tsp Kosher Salt, 1/2 tsp Pepper.  Stir gently until just combined. 

Preheat Oven to 375.

Butter a deep 9" X 12" Lasagne Dish.  Add a few Tbl of Marinara to the bottom of the dish and using the back of the spoon, spread around.

Add first layer of pasta.  Using about 1/3 cup of marinara, lightly coat the pasta.  Add 1/3 of the cheese mixture in small mounds, it doesn't have to be perfect, and spread with an offset spatula.  Layer with Roasted Eggplant.  Top with 1/3 Cup Marinara.  That is layer 1.  Repeat 2 more times.

For the final layer, top with pasta.  Generously top with marinara covering the pasta and add 1 1/2 Cups Mozzarella Cheese.  Drizzle with Olive Oil and sprinkle with Dried Oregano.

Cover with foil and bake for 30 minutes.  Remove foil and bake for an additional 12-15 minutes until bubbly and deep golden brown.  Remove from oven and let rest for at least 10 minutes before cutting.  Everyone will begin to gather in the kitchen and claim to be hungry, but let it rest for at least 10 minutes, regardless of their whining.

For serving, add marinara to the plate.  Place a square of lasagne on top of the marinara.  Serve at once with Crusty Bread and Olive Oil and an Italian Red Wine.  Buon Appetito!!