Tuesday, July 30, 2013

Mushrooms Marsala with Fresh Pasta

This idea goes back a few years ago when I entered some sort of dish into a cooking competition.  That dish inspired me to make this dish.  The thought has been swimming around in my head and I am just getting around to making it for today's lunch.
Last week, I made pasta sheets for my Roasted Eggplant Lasagne and when I was done, I rolled the extra dough into sheets.  I have mushrooms in the refrigerator and thought it would be tasty to make Mushrooms Marsala and arrange the mushrooms on cooked squares of pasta to create a loose stack.  To top it off, I'll add a light dusting of Fresh Parsley and Parmesan Cheese.
This is my recipe for Mushrooms Marsala.  Get a large pot of water on high for cooking the pasta.  If you are using dried lasagne sheets, cook them before cutting them into squares.  Of course, you can always serve this over a dried pasta shape of your choice.  And better yet, if you make pasta, then my all means make some.
First, wipe clean and slice thinly, 1 Pint of Bella Mushrooms.  In a small bowl, stir 2 Tbl Corn Starch with 1/4 Cup Beef Broth.  NOTE: For vegetarian, use Vegetable Broth.  Measure out 1/2 Cup Marsala Wine.
Heat a large skillet over medium high heat.  Add 1 Tbl Olive Oil and 1 Tbl Butter.  Add mushrooms and saute them quickly.  Deglaze the pan by stirring in the 1/2 Cup Marsala Wine and continue cooking for about 2 minutes.  It should bubble and appear to make a glaze.  Add the corn starch mixture.  Add beef broth until you have used a total of 1/2 of the can, you can add more if needed but do so slowly.  Season with S&P.  Continue to let the sauce cook, allowing it to bubble gently for another 4-5 minutes.  Turn off heat and add 1 Tbl Butter and swirl the pan after it has melted.  Cook the pasta either now, if fresh, or while you are making the sauce.
Layer the pasta and Mushroom Marsala Sauce on a warm plate and top with Parmesan Cheese and Finely minced Fresh Parsley.
I edited the sauce to result in a thicker sauce than what is pictured.  I liked the flavor but the sauce was slightly thinner than what I was going for. 

Thursday, July 25, 2013

Roasted Eggplant Lasagne

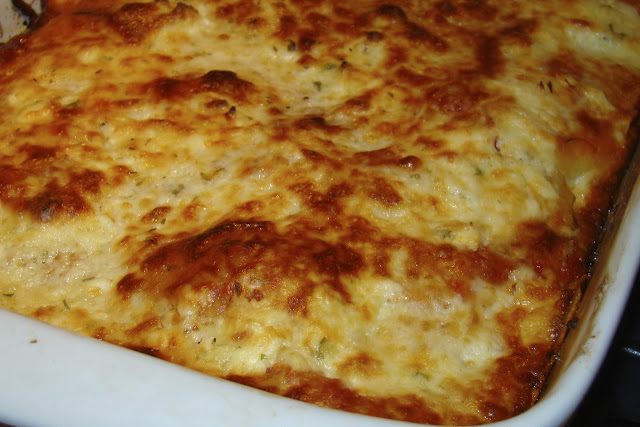
I created this recipe in my head at least a few weeks ago and finally made it for dinner last night.  We all thought it was delicious!!  I used the Feta Cheese Filling I had in my freezer (recipe on this site).  But you can season a mixture of ricotta and mozzarella cheese for a short cut.  I already had some Marinara made as well, so that made life easier for me. I made my own pasta sheets while the Eggplant was roasting but you can use the no-bake sheets available at the grocery. NOTE:  I made and photographed a triple layer lasagne and I could've made it 4 layers.   Next time I will.  This recipe is for 4 layers.

If you are making your own marinara, make that first.  You will need about 3-4 cups total when using fresh pasta.  For dried pasta, you will need to add a bit of water to the lasagne so the pasta doesn't dry out the lasagne. 

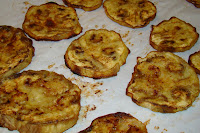
Preheat oven to 300 for convection, otherwise 325.  Line 2 sheet pans with parchment paper for simple cleanup.  Next, Peel and Cut to 1/4" slices, 3 Medium Eggplants.  Brush each side generously with Olive Oil.  Season with S&P and place in oven.  After 20 minutes, flip the eggplant over and if it looks dry, brush with additional olive oil.  Rotate the pans and cook for the remaining 20 minutes, 40 minutes in all.  Remove from the oven when golden brown. 

While eggplant is roasting, get everything set up.  If you are making pasta sheets, get them done and cut.  Mix 8 oz Ricotta Cheese with 2 Cups Mozzarella Cheese.  Add 1 Egg Yolk, 2 tsp Dried Oregano (for Fresh 1 Tbl), 2 Tbls Fresh Parsley, 1 tsp Basil (for Fresh 2 Tbl), 1 tsp Kosher Salt, 1/2 tsp Pepper.  Stir gently until just combined. 

Preheat Oven to 375.

Butter a deep 9" X 12" Lasagne Dish.  Add a few Tbl of Marinara to the bottom of the dish and using the back of the spoon, spread around.

Add first layer of pasta.  Using about 1/3 cup of marinara, lightly coat the pasta.  Add 1/3 of the cheese mixture in small mounds, it doesn't have to be perfect, and spread with an offset spatula.  Layer with Roasted Eggplant.  Top with 1/3 Cup Marinara.  That is layer 1.  Repeat 2 more times.

For the final layer, top with pasta.  Generously top with marinara covering the pasta and add 1 1/2 Cups Mozzarella Cheese.  Drizzle with Olive Oil and sprinkle with Dried Oregano.

Cover with foil and bake for 30 minutes.  Remove foil and bake for an additional 12-15 minutes until bubbly and deep golden brown.  Remove from oven and let rest for at least 10 minutes before cutting.  Everyone will begin to gather in the kitchen and claim to be hungry, but let it rest for at least 10 minutes, regardless of their whining.

For serving, add marinara to the plate.  Place a square of lasagne on top of the marinara.  Serve at once with Crusty Bread and Olive Oil and an Italian Red Wine.  Buon Appetito!!


Wednesday, July 24, 2013

Homemade Mozzarella

My sister, D, gave her daughter a cheese making kit a few years ago and they have been making Mozzarella Cheese from scratch since.  I finally bought a kit and am going to give it a go.  I am really excited and hope you are, too! 
First step is to find "Pasteurized Milk" since I can't use Ultra-Pasteurized Milk." I found the grocery about a mile from my house sells pasteurized whole milk, so I bought it yesterday.

Yeah!  This morning I made the cheese.  First I had to watch a video a number of times because there are critical steps of stirring, timing, and temperature to be mindful of.  The kit I have is from Ricki Carroll, about $25 online.  It will turn 40 gallons of milk into cheese.  Each gallon makes about 16-20 ounces of finished cheese, though that is a rough estimate without weighing it.  If you venture into this, you will find that you work with One Gallon of Whole Milk at a time.

Pictured is the finished product ready to eat.  Next time I know to pull the cheese more times than I did to make it more elastic and therefore more stringy.  I also learned to have an ice bath ready so once the cheese is formed to my liking, I have it ready.  My first two balls were still warm and flattened as they cooled on a plate.  I decided to eat one of those "mistakes" first.  All in all, it took me longer than the 30 minutes but next time will be faster.  And all and all, it is delicious!!

Monday, July 15, 2013

Fried Calamari

Recently, my husband went to an Asian store near New Orleans.  He picked up the ingredients for a Japanese dinner.  We brought out our rice cooker purchased specifically for Nishiki Rice.  He rolled some California Rolls and we cooked potstickers (which they sell frozen) and taste nothing like the ones I make from scratch.  While he was at the store, he asked about buying squid.  They carry Frozen Squid, 3 to the package, for about $10.  He brought them home, watched some videos over the past few days, and yesterday he prepped them.  He gave one to me for making fried calamari.

Over the years, I have said to get good at making something, you have to prepare it at least three times.  I was out on a limb, venturing into this, so I'd say for a first time go, I'd give myself a B- but we both learned a lot.

He wanted to make calamari salad, so he cooked 2 of the squid, cleaned, but with the skin on.  After two minutes in a rolling boil, he cooled them in an ice bath.  The skin came off easily and the calamari was quite tender, more so than mine.  

For mine, he did the cleaning.  There's the whole bit about removing the head; though he removed the ink sac (for lack of a better word), we didn't extract the ink for use, though you can.  Then it was skinned and the teeth removed from the tentacles.  Pictured is his handy work after the fact.

I read not to cook them more than 2 minutes or they will be tough.  I think for frying, it's more like 45-60 seconds.  That means the oil really needs to be at  360-375 for "flash frying" purposes.  Next time I will measure the temperature because they were not as tender as I would like.  Also, based on the size of the tentacles, we need smaller squid.

While I heated oil for frying, I prepped Panko Bread Crumbs by crushing them further using my meat tenderizer.  To them I added, Parsley, Paprika, S&P.  Working in small batches, I pressed the calamari rings into the crumbs and then placed them in the hot oil and cooked until golden brown.  I added additional salt as I pulled each batch out.

I think they should be eaten as they are cooked.  I put them on a cooling rack lined sheet pan in the oven heated to 250...wrong thing to do.  Just eat them while hot with zesty marinara for dipping.

Be sure to dispose of the oil right away, in fact, I encourage you to make these on a night the trash is going out.  All in all, I look forward to trying this again.


Friday, July 12, 2013

Butterflied (or Butterfly) Potatoes

I am grilling Rib Eye Steaks tonight.  I plan to slice them since they are thick.  I am cooking what my mother used to call "Butterflied Potatoes".  These can be made with any variety of potato that lends itself well to roasting in the oven.  Here is the recipe for Butterflied Potatoes.

Preheat oven to 375.  Cut 4 Large Red Potatoes in half.  Place cut side down and without going all the way through to the bottom, slice each one at 1/4" intervals.

Place the potatoes in a glass dish and drizzle each with 1 tsp Olive Oil.  Sprinkle with S&P to taste.  Add 2 Tbl butter to dish.  Place in hot oven for 40-50 minutes depending on how big your potatoes are.  Every 10 minutes or so, baste each potato with the olive oil/butter mixture.  This will open up the slices of potatoes, like a butterfly.  This dish never fails to take me back to my childhood days, when Sunday dinner was served at 1pm.

Thursday, July 4, 2013

White Chocolate Ice Cream

If you follow my blog, you know by now, I really like White Chocolate.  Yesterday I collected the ingredients I need to make White Chocolate Ice Cream.  Today we are going to make White Chocolate Ice Cream With Strawberries.  My ice cream maker has an opportunity to add fruit before the ice cream gets too hard.  Though I was going to buy raspberries, I have strawberries on hand, so I'll use them.

This recipe is in my homemade cookbook which is a random collection of cut out magazine recipes, so I don't know what magazine it comes from.  There is a note that whoever published it does mentions that it came from their friend, Lee Klein.  So based on that, this is Lee Klein's White Chocolate Ice Cream Recipe.

Last time I made Ice Cream, it was too thick, like a pudding, and when served it was like a frozen pudding and as it melted it didn't seem like ice cream.  I cooked it until it coated the back of a spoon but I think I got to that state too quickly because the mixture was cooked at too high a temperature.  It's been a while, but hopefully this one will work out this time.

Ok, I made the ice cream and added strawberries.  It tastes very good and looks to be the right consistency.  This recipe called for it LIGHTLY coating the back of the spoon and I know when I made it last it was too thick.

Here's the recipe.  Set up a double boiler.  I used a glass bowl and a pot that it fit into snuggly.  Add enough water to the pot so that the bottom of the bowl touches it.  Bring the water to a simmer.

To the bowl, add 1 Cup heavy Cream, 1 Cup Whole Milk, 1/3 Cup Sugar, 1 Pinch of Salt and 4 Egg Yolks.  Place the bowl over the simmering water and stir until the custard gets hot and begins to thicken.  When you dip a wooden spoon into the custard, it should lightly coat the spoon and leave a clean trail when you draw a line through the custard.  This may take 4-5 trys until you are satisfied with the consistency.  Remove the bowl from the pot. 

Transfer to a clean cool bowl and stir in 4 oz White Chocolate and 1 tsp Vanilla.  Once it becomes smooth, place ice in a larger bowl and set the smaller bowl with the custard into the ice.  Stir with a wire whip while the custard cools.  Once cold, stir in 1/3 Cup Buttermilk and 2 tsp Fresh Lemon Juice.

Place the custard in your ice cream maker and turn it on for 20 minutes.  I have a simple 1 speed Cuisinart model and it worked just great.  If yours is like mine, you can add ingredients to the ice cream.  I added 6 Cut up Strawberries after the first 10 minutes of freezing, but note, the pieces have to be small.

The custard will not completely freeze but will be well on it's way.  It needs to be transferred to a container and placed in the freezer.  You can see by the picture what I chose.  In order to get hard, the ice cream needs to freeze for 4-6 hours before serving.  

Hope you get a chance to make ice cream this summer!


Tuesday, July 2, 2013

Bacon and Shallot Crusted Pork Loin Chop

This was a simple preparation and results were delicious.  Buy 1 Boneless Loin Pork Chop per Person - at least 1 1/4" thick.  I bought 3 chops and had extra bread crumbs, so these quantities will work for 4 chops.

Making the coating: This part can be done in advance.  Finely mince, 2 Strips of Applewood Smoked Bacon, you can buy just 2 strips in bulk at a good grocer and even though the butcher will raise an eyebrow, don't pay any attention to him or her.  Saute the minced bacon in a small skillet over medium heat.  While it begins to cook, finely mince 1 Small Shallot and add it to the bacon.  Continue cooking until it is a light golden brown. Note: this mixture will continue to cook as a coating, so it should be under done.  Turn off the heat and add to it 1/2 Cup Panko Bread Crumbs, 1/4 Freshly Ground Pepper, 1 /2 Tsp Parsley, Salt if you feel you need more

Getting ready to cook:  Preheat the oven to 350.  Take Pork out of the refrigerator about 30 minutes before cooking.  Preheat an oven proof skillet over medium heat.  Add Olive Oil enough to lightly coat the bottom. 

Ready to Cook:  This part takes about 30 minutes depending on how thick your chop is.  Note: if your chop is closer to 1" thick, preheat the oven to 375 and cook for less during that step.  Spread a 1/2 tsp Stone Ground Mustard to the top side (ONLY, not the sides themselves) of the chop.  Press into the crumbs.  Lay crumb side down on a plate and repeat with other side placing the chop directly into the skillet as you go.  Press the crumbs into the upward facing side so they really stick to the chop.  Immediately wash your hands when done.  I use mustard in a squeeze bottle.  If you are spooning it out of a jar, put desired mustard into a small bowl as to not contaminate the jar of mustard. 

Finishing off in the Oven:  When the first side done, the chop will release easily from the pan.  This will take about 5 minutes.  Once it's turned, place skillet in the oven for finishing.  My chops were about 1 1/2 " thick so I let them cook for about 20 minutes.  When they are done (and don't over cook them) they will feel firm but not hard.  Remove them from the pan and onto the plates or a serving platter.  Let them rest for 5 minutes before serving.  I simply add a small piece of foil to each plate and loosely wrap 2 of the corners.

LAST NOTE: When handling the chop once coated, handle it with tongs by the side or the coating you pain stakingly created will fall off.

I served these with Fresh Corn on the Cob, Sliced Garden Tomatoes (from my in-laws), and a Warm Crusty 5-Grain Boule.  What a satisfying summer dinner!!