I began following CheeseByNumbers after I saw Melissa Mullen on Rachel Ray. I need to get better at this but I had a lot of fun putting it together. I easily could've added some sprigs of herbs and grapes, but I couldn't find Champagne Grapes which is what I wanted. On the left is my jumping off point.
This is what a made. Beginning at the top left corner and serpentining around the tray: Grains First Crackers, Pepperoni, Camembert wedges with Pomegranate, Pistachios behind the Olives, Kalamata Olives - in a bowl I made about 17 years ago, Sliced Gouda, Blue Cheese Spread with Pomegranate, Crisp and Buttery Crackers, the small bowl is for local honey, Fontina Cheese wedges, Blackerries, Duck Liver Pate, not seen Whole Cashews, Hard Salami.
Lots to learn but lots of fun, too!
Here's one that served 10 people on Thanksgiving Day, pre-feast.
Sunday, December 16, 2018
Barbeque Shrimp meets Sushi
Using Pinterest, I saved a picture of something like this but when I went to review the recipe I got an error message. This past Thanksgiving, while in the Outerbanks, we had an Asian inspired night and my sister, D, made something similar to what I had previously pinned.
I hosted a party last night and did a mix of the 2 things I had in mind knowing all the while I would be blending the ingredients with New Orleans style Barbeque Shrimp seasoning.
This recipe made 20 stacks. Cook 1 Cup Nishiki Rice as directed on the package. Once done, place it into something like a large flat bottom bowl or platter so it can cool. I like to use a flat bottom wooden salad bowl in order to give me a lot of surface area. Dress the rice for Sushi sprinkling the following: Mix together 1 Tbl Rice Vinegar, 1 1/2 tsp Sugar, 1/2 tsp Salt. Using 2 forks lightly toss until the seasoning is combined with the rice.
Using a total of 3 Avocados, mash 1 1/2 Avocados and dice 1 1/2 Avocados. Add the juice of 1/2 Small Lemon, Salt and Pepper and 1/2 Cucumber, peeled and seeds removed then diced. Mix together gently. Refrigerate until you are ready to assemble.
Cook the Fresh Shrimp (in my case I cooked 24 of them) over medium heat in 2 TBL Butter. Once almost done, add the Juice of the other 1/2 Small Lemon, 1TBL Worcestershire Sauce, 1-2 TBL of your favorite Barbeque Shrimp Seasoning. Toss to coat and turn off heat.
To assemble, I used a tall 2" round metal timbale mold. Using wet fingers, press 1 1/2 to 2 Tbl Prepared Rice to the mold. Continue making the rounds until the rice is gone. Add desired avocado to the rice, top with a single shrimp.
If you want a more refined look, you can also add rice again to the the top of the avocado and then remove it from the mold. Then top that with a shrimp placed on its side and drizzled with the barbeque butter. I thought this was plenty of rice for the very large shrimp I used. For my first time, I thought this was quite tasty.
Sunday, October 21, 2018
Chocolate Macaroon Pie by Dorothy Kern
I would aptly rename this recipe Coconut Macaroon Chocolate Ganache Tart. I think it more fittingly describes what you are making.
This was one of those videos that floated around a few weeks ago that caught my attention. I've now made it two weekends in a row but the 2nd time I made a few adjustments and I think it turned out extremely well! My in-laws were visting last weekend so I made it for the first time for them. My son had a friend over yesterday and rather than spend money on dessert, I told them to come home and make it for dessert to eat a few hours later. I think my adjustments made it a keeper so I'm sharing it with you!!
Thank you Dorothy for yet another tart shell idea. Tarts have to be one of my favorite things to make.
So first off, I used a 10" tart pan and had way too much crust for the size pan. I bought an 11" tart pan yesterday and it was perfect. I also cooked it longer than the recipe stated because I wanted the tart shell to be a dark golden brown and slightly crunchy on the exterior while still being chewy in the middle. Wow, this did it perfectly.
The only thing I would add is either berries, for instance Raspberries, or any kind of toasted nut like Macadamia or Hazelnuts chopped up and topped atop whipped cream at serving. NOTE: I topped the slices with whipped cream to order to cut the richness.
Let's get started. Preheat oven to 350.
To a large bowl, measure 5 1/2 Cups Coconut. Add to it 2/3 Cup Flour and 1/2 tsp Salt. Mix to coat the coconut. Add (1) 14oz Can Sweetened Consensed Milk and 2 tsp Vanilla and mix until combined. Press into the tart pan using floured fingers. Bake for 25-30 minutes.
With 5 minutes to go, make Ganache. In a heavy bottomed pot, Heat 1 Cup Heavy Cream until it's about to boil NOTE: Don't let it boil. Remove from heat and add 12oz Semi-Sweet Chocolate, I used Nestle's Chips. Stir until the chocolate is melted and completely combined. When shell comes out of the oven, pour in ganache. Let cool for 5 or so and place in refrigerator.
Serve once it sets up and can be sliced. Top with whipped cream and chopped nuts. Enjoy with hot coffee!
Thursday, October 18, 2018
Brie Bites in Phyllo Cups
This is one of those simple recipes. I don't know what magazine this came from. I cut it out and threw the magazine away when I was getting ready to move. I made a couple of adjustments after making it a second time, so this is what I have.
Preheat oven to 350.
Buy 2 Packages of Phyllo Cups in the frozen secion. They come pre-baked and 15 per box. Place them on a cookie sheet.
Cut the rind off an 8oz Wheel of Brie. Cut into strips about 1/4" thick. Cut the strips into pieces about 1" long. Add 1/2 tsp Red Pepper Jelly to the bottom of each cup. Place Brie piece on top of the jelly and press down lightly. Top with a Pecan half. Brush the pecan with Melted Butter.
Place in oven for 8-10 min until chesse is melted and bubbly. Serve warm or at room temperature.
Friday, August 24, 2018
Avocado Caprese Salad
This was another video that was floating around. You hardly need a recipe.
Heat 1/4 Cup Balsamic Vinegar with a Pinch of Sugar over medium heat. As soon at it starts to simmer, remove from heat. The water will evaporate to create a more concentrated thicker Balsamic Glaze.
Cut Avocado in half and remove the pit. Brush with Lemon Juice to keep from turning brown. Cut Mozzarella Pearls and Grape Tomaotes in half. Add these to the avacado cavity. Drizzle with Oil Olive and Balsamic Glaze. Add S&P and Basil. Serve at once.
Chicken Roulade
You've seen the quick videos that show a dish being prepared, well this one caught my eye. What I like most about it is that it can be made most of the way and finished in the oven in about 20 minutes give or take whether or not I had to refrigerate it first. I like a meal like this because I can get it mostly ready then dinner can be on the table in the time it takes to cook the pasta.
Preheat oven to 375.
Each chicken breast will net 2 roulades. First, rinse 2 Boneless Chicken Breasts and filet each in half resulting in 2 full sized breasts but half as thick. Place in a gallon zip lock and pound them to get a consistant thickness. Pat them dry with a paper towel. Add S&P and Pesto. (NOTE: I added Basil Leaves instead of pesto, so either way can work.) Add 2 or 3 Thin Roma Tomato Slices and Grated Mozzarella Cheese. Roll the chicken breast, starting with the pointed end and secure with a tooth pick. Heat a skillet over medium and add Olive Oil to coat. Brown all sides of the chicken. It will not be completely cooked through and will have to be finished in the oven.
Once browned, top with Mozzarella Cheese, drizzle with Olive Oil and add S&P and a Basil Leaf. Add Grape Tomatoes to the pan and place in hot oven for 15-20 minutes. Serve over hot Pasta.
If making this ahead:
Once the roulades are browned, let cool and refrigerate . Remove from the refrigerator as the oven heats to 375. Heat the skillet and add Olive Oil to coat. (If you don't heat the skillet first, the chicken will absorb the oil resutling in a greasy finsihed product.) Add the Chicken Roulades and top with Mozarella and drizzle with Olive Oil and S&P and a Basil Leaf. Add grape tomatoes and place in hot oven. May need 20-22 minutes to finish so it is cooked thoroughly and hot in the center. Serve over hot pasta.
Some other roulade ideas are Brie and Asparagus or Ham and Swiss.
Labels:
Brunch,
Budget Meals,
Buffet,
Chicken,
Dinner,
Entree,
Gluten Free,
Menu Planning,
pasta
Friday, June 15, 2018
Jalapenos & Fresh Corn-off-the-Cob Corn Muffins
I have been wanting to make these for ages. I had Fresh Corn-off-the-Cob and home grown Jalapenos Peppers. Though it's hot out today, I made them anyway.
Feel free to mix up your own corn muffin mix from scratch, but I used Jiffy since I've been wanting to use it up. Remember, muffins (no matter what kind) are wet into dry and are only mixed until just blended.
This makes 10; I like to leave the corners open for easy handling. Preheat oven to 400. Either grease a muffin pan or use paper muffin papers.
Add 1 Box Jiffy Corn Muffin Mix to a bowl. Add 1 Cup Fresh Corn and 1 Minced Jalapenos Pepper and stir. In a measuring cup, measure 1/3 Cup Milk and add 1 Large Egg, stir to combine. Add wet to dry and blend until just blended. Using a scoop, fill each cup until 2/3 full. Bake for 15-20 minutes.
I plan to serve mine with honey flavored butter, but either ingredient on their own works well too! Enjoy!!
Saturday, June 9, 2018
Potatoes Anna
This is a very old classic recipe. It's simple to make and cooks in the oven.
Peel 2-3 lbs Potatoes. I used small Russets for this, because that's what I had on hand. Cut a 1/2 Stick Butter into small cubes.
Preheat oven to 425 and spray a 10" oven safe skillet with cooking spray. I used my All-Clad stainless skillet.
Using a mandolin, slice the potatoes to 1/16" and arrange them into the pan in a shingled, circular fashion. After each layer, season lightly with Salt and Pepper and after every 2 layers, dot with butter cubes. Make 6 layers in all and dot the top with butter.
Cover the skillet and place in hot over for 40 minutes. Remove lid and bake for an additional 15-20 minutes til a deep golden brown. Remove from oven and let rest for 5 minutes. The "pancake" should easily be removed from the pan and place on a plate with the bottom side upward. Serve at once, sliced into wedges.
Tuesday, April 24, 2018
Lemon Chiffon and Raspberries
My son worked on a restaurant project for Health class. He had to have at least 1 dessert that was GF which was one of many requirements he had to create to satisfy dietary needs. He came up with Lemon Chiffon and Blueberries, so in otherwords, a crustless Lemon Chiffon dessert.
For bookclub tonight I volunteered to make a dessert and decided I would steal his idea. I found beautiful raspberries yesterday so I substituted them for blueberries though any combination of readily available berries will work. I made the chiffon from the Blueberry Lemon Chiffon pie already posted on my site. It's light, not overly lemony or sweet - it's just pleasant enough and I've made it many times to date. I decided to make individual portions in ramekins mostly because they'll be easy to tranport and I have one for each person.
This recipe made (10) 4oz portions.
Place 4-5 Raspberries (I bought 2 pints) in the bottom of each Ramekin and place on a sheet pan.
Zest and juice 2 Lemons so you have 1/2 Cup Lemon Juice.
Heat a pot of water that can be used as a double boiler so that when you place the bowl in the pot, it's a tight seal and the water reaches the bottom of the bowl.
I have a hand mixer as well as a stand Kitchen-Aide mixer, so I use my hand mixer for the yolks and the Kitchen-Aide for the Whites.
Separate 4 Eggs into 2 bowls, the yolks go into your double boiler bowl.
While beating the yolks, slowly add 4 TBL of Super-fine Sugar. The yolks will become pale and thicker and will create a ribbon when you raise the beaters. While beating, slowly add the lemon juice and stir in the zest. The mixture will thin out at this point. Place the bowl on your pot of water and continue beating until the mixture becomes thick and is very warm to the touch. Remove from heat without over cooking it.
Beat egg whites until foamy and add a few pitches of salt then beat until the volume more than doubles and has medium peaks (ones that fold over but hold that shape) when you remove the beater. Slowly add 3 TBL Super-fine Sugar and continue beating until stiff and glossy but not dry. Fold whites into the yolks, adding small amounts at a time. This should take 4-5 additions and you should be left with no whites showing and a consistent pale yellow color throughout.
Spoon or pipe chiffon onto the raspberries.
When ready to serve, preheat oven to 400. Bake for 10-12 minutes until golden brown. Serve at once or at room temperature.
Friday, March 9, 2018
Asian Inspired Orange Thyme Chicken Thighs
I was going for something quick and juicy but full of flavor. This made up recipe did the trick. First rinse and pat dry 8 Chicken Thighs (originally I made 4 thighs but the next time I made 8). If they are too wet, they don't brown well, so pat them dry with a clean paper towel. Season both sides with Salt, Pepper and Thyme.
Heat a skillet, large enough to fit the chicken in a single layer, over medium heat. Add 3 TBL good quality Olive Oil. Let the oil heat through. Dust the thighs very lightly with flour and place flour side down. This will add a touch of a crunch without it being a breading or a coating. Dust the upward facing side lightly with flour. Once chicken is golden brown on first side, flip over each thigh. When the second side is golden brown, remove from pan and place on a dish, tent with foil allowing steam to escape.
Pour out any excess oil. De-glaze skillet with 1/2 Cup Orange Juice. Carefully get the browned bits from the pan. Should take about 3-5 minutes, stir all the while. Add 1/3 Cup Orange Marmalade to the pan and stir to combine. Season with Salt and Pepper and Red Pepper Flakes.
Return thighs to the pan and heat through. Add any juice from the plate to the sauce. Serve with good quality rice and vegetables of choice.
Labels:
Brunch,
Budget Meals,
Chicken,
Dinner,
Entertainment,
Entree,
Meat
Friday, February 16, 2018
Baked Broccoli Rice
I was walking through a big boxed store earlier this year and they were sampling Broccoli Rice. I never buy stuff I can make at home but I knew it was something my growing teen would love. So I sampled it in order to make up my own recipe. It's really a simple dish to assemble and bakes for about 25 minutes plus it can be made ahead. It lends itself well if you need to bring a dish with you. Will pair nicely with any meat, for example, Grilled Steak, Roasted or Grilled Chicken, Baked Ham, Panko Crusted Pork Chops, really you name it. It also holds the heat well if you are transporting it to someone's house.
Preheat oven to 375.
First, cook the rice so it's slightly under done. You should do this whenever baking any pasta or rice so you don't end up with mush.
I like to use Bismatti Rice because the grains are long and the rice has a pleasant nutty flavor. Add 1 Cup of Rice and 1 1/2 Cups of Water to a pot fitted with a lid. Add Salt to taste and 1 TBL Butter. Stir with a fork. Cover and place over medium heat and cook until it's about to boil. Reduce heat to low and simmer for about 6-7 minutes. Turn off heat and give it another quick stir, replace lid and let the water absorb. Remove from heat, rinse in cold water, and strain, to stop the cooking process. You can leave it in the strainer.
Add 2" of water to a pot that will fit a steamer basket and heat water (without the basket) over medium heat. Rinse and cut Broccoli so you have tops with a small amount of stem. You want 2 Cups of Cooked Broccoli in total. Place the Broccoli in the steamer basket and place it in the preheated pot with water. Return lid and let steam for about 2 minutes. The Broccoli should be bright green. Remove from heat and rinse in cold water to stop the cooking process.
Make a quick béchamel. In a thick bottomed pot, over medium heat, melt 2 TBL Butter. Once melted, add 2 TBL Flour and stir with a wire whip and cook until it bubbles gently for 3 minutes. Do not let it brown. Add 1 1/4 Cups Milk. Let it cook for another 6-8 minutes, until it thickens. Add 2 Cups of Grated 4-Cheese Mexican Blend and stir until the cheese is melted. Season with Salt and Pepper to taste. Add broccoli and rice to the sauce and gently stir with a spoon.
Butter a caserole dish large enough to hold the rice mixture. Add the mixture to the dish and top with bread crumbs. Dot with 6-8 1 tsp bits of Butter and season lightly with Paprika.
I grind my own bread crumbs, but Panko works well.
Bake in hot over uncovered for 25-30 minutes until bubbly and warmed through. Let rest for 5 minutes before serving.
Monday, January 15, 2018
Chick-Fil-a Knockoff Sandwiches
I have made these now 3 times and the third time they were very close. The first time I made them the chicken was too thick. I fileted the breasts making them thinner but they were far too big around. The second time, I added flour because the recipe didn't have enough corn statch but that didn't work very well.
This third time, I cut the breast in about half, and the I fileted the thinner end into two pieces and the thicker side was fileted into 3 pieces. These were the perfect size. The other change I made the third time, was from my tempura days, I decided to double the corn starch the recipe called for and I added Baking Powder - that made all the difference in the world. Instead of 2 breasts, I graduated to 4 Boneless Skinless Chicken Breasts which netted 18 peices of chicken. My son ate most of it! I think I got 1 sandwich from that batch.
Harris Teeter sells Boneless Chicken Breasts for $1.99 a pound and you can't beat the quality, no hormones used, and the pieces for the sandwich ends up somewhere around $.35-$.40 each! Not bad.
First, rinse and filet the chicken breasts. Add no more than 9 or 10 pieces to a 1 gallon Zip lock bag. For each bag: add 1/2 Cup Dill Pickle Juice, I like Mount Olive Hamburger Dills. Marinate for 1 1/2 to 2 hours. Meanwhile get dry ingredients ready. 1/2 Cup Corn Starch, 2 tsp Paprika, 1 tsp Baking Powder, 1 tsp Salt, and 1 tsp Pepper. In a bowl, beat 1 Egg with 2 TBL Buttermilk. After marinating, open bag and squeeze the open end, so the chicken remains inside, and drain the juice. To the bag add the egg mixture and massage. Let it sit for 5 minutes. Again, pour out any excess liquid and add the dry ingredients. Zip the bag closed and massage the dry ingredients until you know the chicken is coated. In the meantime, heat a pot (I use my iron pot) with 4" Canola Oil until 375 on a thermometer. Preheat oven to 275. Add a cooling rack to a sheetpan. Add 4-5 pieces of chicken to the oil. Once it begins to look opaque around the edges, flip each piece over. Cook until the same golden brown. Place on the ready cooling rack and place in the oven. Let the oil get back to temperature before adding more pieces. Continue cooking until all the chicken is done.
For serving, lightly butter and brown a Soft Style Hamburger Bun. Add chicken and top with pickles. Enjoy!!
Pictured, I made dish of Baked Beans that my sister C turned me on to and is posted here on my blog. Go to the search tab on the top right corner and type in Baked Beans and it should come up.
Sunday, January 14, 2018
Baked Cheesy Stuffed Paccheri
I made this recipe up. I wanted to make a different presentation than what I have done in the past. I used to get large penne pasta from World Market in Louisiana and loved them, but they stopped carrying them. I was in a World Markets in NC and found Paccheri that worked just as well, so I'm back in business!
Recipe to come soon!
Tuesday, January 9, 2018
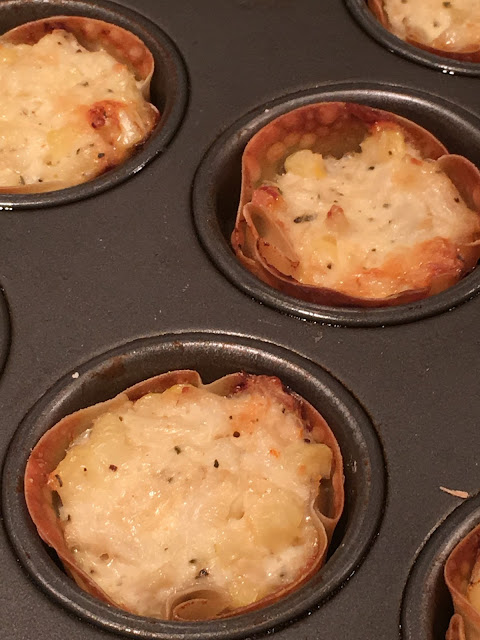
Mini Baked Crab and Corn Dip Cups
I better put this in here before I forget what I did!! I bought 8oz of Fresh Crab Meat and a 1 package of Wonton Wrappers and that was enough to inspire me to make up this finger food which was served during the Wild Card NFL games. I made 24 cups and had enough filling to make an additional 8-10.
Peel and cook in boiling water 2 Ears of Fresh Corn for 2 minutes and quickly rinse in cold water. Remove corn from cob. Place in bowl.
Beat 3 oz Cream Cheese with 1/2 Cup Sour Cream. Beat in 1 Egg. Mix in 1 Cup Parmesan Cheese. I used fresh, already grated Parmesan but you can kicked it up if you want to grate your own. Add Salt & Pepper to taste and 1/2 tsp Thyme, 1/4 tsp Paprika. Stir in Corn and 8 oz Crab, lump is best but don't get claw meat
Preheat oven to 375. Melt 2 Tbl Butter. Using a Cooking Spray, lightly coat the cups of a mini 24 cup pan. Using a biscuit cutter, cut 24 Wontons in rounds. Add a wonton to each cup and butter the inside with melted butter. Add filling until just slightly below the top of the cup, these will rise a little. Bake for 20 minutes or until the filling looks set and the cups are browned. Serve at once.
NOTE: You can add either sauteed Minced Shallots or thinly sliced Scallions to the mixture for additional flavor. I opted to go without but next time I will add one of them. The crab flavor is more prominent without these flavors.
Saturday, January 6, 2018
Linguine Carbonara
We had 2 snow days which has extented our New Year Holiday and left me motivated to try some new dishes! I figured Pasta Carbonara is perfect dish for a cold winter night.
This one was pictured in Williams-Sonoma's Christmas catalog and caught my eye. They used to print the recipes within the pages but now you have to go online and their test kitchen posts all of their ideas in their recipe section. I had to do a bit of hunting but finally located the one I was looking for.
They used a fat spaghetti shape and I used Linguine. I think both are suitable. I read all the time about adding reserved pasta water to dishes but this is the first time I actually did it. My family competely loved this dish and I can still imagine the delicious flavors, even now, so needless to say, this recipe is a keeper!
I served it with a simple salad but you can pair this with all manner of things, a Grilled Veal or Pork Chop, Ribs, Boneless Chicken Breast, Italian Sausage, Cheese Toast, even Seared Scallops, but you get the idea, it's versatile! I can even invision adding Orange Zest to this dish for a new dimension.
This makes 4 servings and in my household more like 3 because 1 person, whom we shall not name, ate 2 of them! Cut 6 Slices of Thick Smoked Bacon Crosswise into 1/2" Lardons. (NOTE: Lardons are my new favorite Bacon shape!)
In a preheated skillet, cook Bacon, stirring often, until crispy. In the meantime, get a pot of water boiling for pasta and ready 2 Cloves of Garlic in the garlic press. In a bowl, beat 2 Eggs and add 3/4 Cups Parmesan Cheese. Mince 1 Tbl Fresh Parsley. Once you remove the cooked bacon, press the garlic into the bacon fat and cook til fragrant, about 1-2 minutes. Remove the garlic with a slotted spoon and add to the dish with the bacon.
When ready, cook 12 Oz Pasta til al dente and reserve about 1/2 Cup of Pasta Water. Strain pasta and return to the pot. Add the Egg and Parmesan Cheese mixture. Toss to coat until cheese is melted. Add pasta water as needed to create a sauce that just coats the pasta. Top with the Bacon, Garlic and place in Pasta Serving Platter. Serve onto pasta plates, grate additional Parmesan to order and top with parsley and freshly ground salt and pepper. Enjoy!
My son took a photo using a filter and though I am typically against filtering my food photos and don't even edit them, I have to admit this one looks pretty appealing. You be the judge.
Labels:
Brunch,
Budget Meals,
Dinner,
Eggs,
Entertainment,
Entree,
Menu Planning,
pasta,
Side Dish
Friday, January 5, 2018
Scratch Made Green Bean Bake
My sister, D, served green bean bake on Christmas. Truth be told, after leaving home I never once made this dish nor had a hankering for it, nor have I ever even bought French's Crispy Fried Onions. It was never my favorite dish when my mother made it, but when I saw my sister's version, it looked different from what I recalled and it definitely smelled better. When it was served, it was the first thing I tasted and it was awesome.
I asked her about it and she said they made it from scratch. Hers didn't have mushrooms and I couldn't find a recipe that omitted them. I got in my head how I would make a quick sauce but came across recipes with cheese and really all manner of twists depending on what direction the recipe went. With that, I called her to find out what she did. There wasn't cheese in hers but there were some other ingredients that gave the dish flavor and though she didn't have mushrooms, she thought she would add them next time.
This is my made up version of scratch made green bean bake. String 12 oz Green Geans and blanche for 1 minute, rinse in cold water when done. Butter a casserole dish. Remove stem and clean and dice 6 oz Baby Bellla Mushrooms. Slice thinly 1 Medium Shallot. I made my sauce in a low sided pot, large enough for everything before pouring it into the casserole dish. Heat a pot over medium heat. Add 1 Tbl Olive Oil and 1 Tbl Butter. Add shallots and mushroom and sautee for 3 minutes til tender. Dust with 2 Tbl Flour and stir. Add 2 Tbl Sherry. Let the alcohol evaporate, about 1 minute. Add 3/4 Cups Chicken Broth and cook for about 5 minutes, letting the sauce thicken without allowing it too boil, but it should bubble gently. Add 2 tsp Worchestershire Sauce, I like Lea and Perrins. Add 1/3 Cup Half and Half. Let cook for another 2-3 minutes. Add the beans and stir to coat and pour into prepared casserole dish. Top with French's Crispy Fried Onions.
Preheat oven to 375 and bake for 25 minutes until bubbling. Let rest for 5 minutes before serving.
I have a growing teen and though my husband and I had a serving each, our teen ate the rest. So this can serve 4 but next time I plan to double the recipe.
Subscribe to:
Posts (Atom)